Skip to content

Lesson Commissioned Portraits

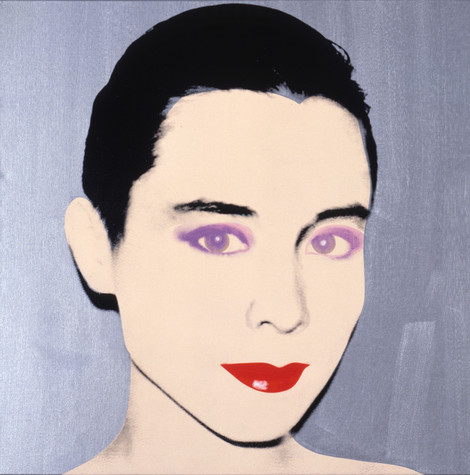
A screen printed portrait of Tina Chow against a silver background. Chow’s skin is pale peach, a stark contrast to the deep black of her hair and eyebrows, the lavender of her eyes, and the cherry red of her lips.

Andy Warhol, Tina Chow, 1985
The Andy Warhol Museum, Pittsburgh; Founding Collection, Contribution The Andy Warhol Foundation for the Visual Arts, Inc.
© The Andy Warhol Foundation for the Visual Arts, Inc.
1998.1.521

Explore portraiture and use collage to create a self-portrait.

Students apply an easy collage process to alter their self-portraits using photographic images. Using Andy Warhol’s photographic silkscreen portraits, students explore portraiture and why artists are paid to create portraits.

Objectives

  • Students identify formal aspects of portraiture.
  • Students discuss the historical importance of portraits.
  • Students assess the importance of portraiture in culture.
  • Students compose portraits based on personality traits.
A screen printed portrait of Tina Chow against a silver background. Chow’s skin is pale peach, a stark contrast to the deep black of her hair and eyebrows, the lavender of her eyes, and the cherry red of her lips.

Andy Warhol, Tina Chow, 1985
The Andy Warhol Museum, Pittsburgh; Founding Collection, Contribution The Andy Warhol Foundation for the Visual Arts, Inc.
© The Andy Warhol Foundation for the Visual Arts, Inc.
1998.1.521

About the Art

Warhol started painting commissioned portraits in the early 1960s. These works developed into a significant aspect of his career and were a main source of his income in the 1970s. Many of his subjects were well known in international social circles, the art world, and the entertainment industry at the time.

Warhol began each commissioned portrait with a photo shoot using a Polaroid camera. The Polaroid afforded a very high contrast image that Warhol enlarged and transferred onto a silkscreen. Each portrait was “under-painted” first. Warhol traced simple outlines of the photographic image onto the canvas and painted in blocks of color. Some portraits were painted in slick, hard-edge styles, whereas others had solid fields of color or more gestural brushwork. Once this initial painted layer was dry, Warhol printed the photographic silkscreen image on top.

Points of View

I think eventually people competed to be portrayed by Warhol because that appeared to give them instant immortality, of the sort usually enjoyed only by the greatest of stars or the most celebrated products, as if they were also part of the common consciousness of the time.

Arthur C. Danto, The Nation, April 3, 1989

If there were a portrait commission, we’d have a lunch. It was fun and helped to relax people who were nervous about having their portrait done . . . You never knew who was going to be at lunch. You could have a pop star, if it was somebody very famous, we wouldn’t say that they were coming, we would tone down the lunch. I heard later that people were a little intimidated about coming to lunch . . . We had impromptu things happen, like when Georgia O’Keeffe came to get her portrait, I was videotaping Paloma Picasso and John Richardson, so by chance I also taped Georgia O’Keeffe and Paloma talking about Paloma’s father. Once I was taping a lunch, and Rupert brought John Lennon in while Andy was photographing Liza Minelli. Not every day at 860 was exciting, but you had many times where great people came in that you wouldn’t normally have a chance to really talk to. Andy was the whole reason for it being such a center of energy.

Vincent Fremont, One Stop Warhol Shop, 2000

Discussion Questions

  1. Compare and contrast the formal aspects of Warhol’s portraits (e.g., his use of color and shape, each artwork’s overall balance and unity, and the sitter’s pose).
  2. Are portraits important to us today? Why or why not?
  3. Why have artists painted portraits throughout the ages?
  4. If you could make a portrait of anyone in the world, who would it be? Why?


Materials

Procedure

  1. Plan your portrait, deciding which personality trait you would like to convey. Try different poses, then take the photographs with a digital camera, phone, or polaroid camera. This could be done as a selfie or students could work in pairs and photograph one another.
  2. Using a photocopier, manipulate the photographs to the desired size. If you reduce the image to 5 1⁄2 by 8 1⁄2″, you can place two images per one piece of 8 1⁄2″ by 11″ acetate. Try to make the image high contrast by using the copy machine’s “lighter” and “darker” functions.
  3. Copy this image onto photocopy acetate. Acetate can be ordered through most office supply stores.
  4. Make two to four acetates of each portrait so you can experiment with color and shape.
  5. Choose colored background papers of the same size and hinge the acetate to the background paper using clear tape. To make the hinge, place the tape on one edge of the acetate, and then fold it over to stick on the backside of the background paper. Once this is done, your two papers should open like a book.
  6. Now you are ready to “under-paint” your portrait. Warhol would paint on the canvas first, and then print the photographic silkscreen image on top. For this project, the acetate acts as the final printed layer. The image on the acetate has certain see–through areas; whatever is underneath those areas is visible. Using cut or torn paper, create a collage-type pattern on the background paper so the pattern colors show through the acetate.
  7. Colored foil paper, stamps, and colored markers can also be used for the under-painting. Metallic or permanent markers can be used to draw on top of the acetate surface.
  8. Create variation among the portraits by changing elements such as color and paper edges (e.g. ripped/torn edges and cut/smooth edges), adding linear elements using markers, and working with the background areas as well as the subject areas.

Wrap-up

In a class critique, students present their artwork and answer the following questions:

  1. What personality trait were you trying to convey in your portrait?
  2. Why did you choose certain colors and compositional elements?

Assessment

The following assessments can be used for this lesson using the downloadable assessment rubric.

  • Aesthetics 2
  • Aesthetics 3
  • Creative process 3
  • Creative process 4
  • Creative process 5
  • Critical thinking 1
  • Critical thinking 2