The following assessments can be used for this lesson using the downloadable assessment rubric.
- Aesthetics 1
- Communication 3
- Communication 4
- Creative Process 3
- Creative Process 4
- Creative Process 5
- Creative Process 6

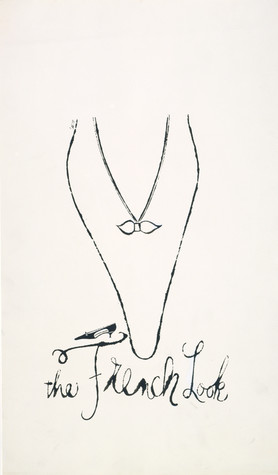
Andy Warhol, "The French Look", 1958
The Andy Warhol Museum, Pittsburgh; Founding Collection, Contribution The Andy Warhol Foundation for the Visual Arts, Inc. © The Andy Warhol Foundation for the Visual Arts, Inc.
1998.1.1266
Warhol’s drawing The French Look is one of many shoe illustrations he created using a type of line drawing known as the blotted line technique. Warhol first experimented with blotted line while still a college student at Carnegie Institute of Technology (now Carnegie Mellon University). He continued to craft this technique in his commercial work in New York City throughout the 1950s. Blotted line enabled Warhol to create a variety of illustrations along a similar theme. This type of production allowed him to bring multiple ideas to clients to increase the odds that one of his drawings would be chosen for the final advertisement.
Blotted line combines drawing with basic printmaking. Warhol began by copying a line drawing in pencil on a piece of non-absorbent paper, such as tracing paper. Next, he hinged this piece of paper to a second sheet of more absorbent paper by taping their edges together on one side. With a fountain pen, Warhol inked over a small section of the drawn lines. He then transferred the ink onto the second sheet by folding along the hinge and lightly pressing or “blotting” the two papers together. The process resulted in the dotted, broken, and delicate lines that are characteristic of Warhol’s illustrations. Warhol often colored his blotted line drawings with watercolor dyes or applied gold leaf.
I was getting paid for it, and I did anything they told me to do. If they told me to draw a shoe, I’d do it, and if they told me to correct it, I would—I’d do anything they told me to do, correct it and do it right.
Another reason why he liked it [the blotted line technique] so much [was that] by having your master drawing with which you made your blot, you could keep blotting it and redrawing it and blotting it each time and make duplicate images.
Warhol’s commercial art assistant Nathan Gluck in Patrick S. Smith,
Andy Warhol’s Art and Films, 1986
It was absolutely true that he could draw anything and very, very quickly. And, so, we used him a lot.
Art director Tina S. Fredericks in Patrick S. Smith,
Warhol: Conversations about the Artist, 1988
Andy and I began a campaign, which was unprecedented at the time. We ran full pages, half pages, every Sunday in the New York Times. And it was a spectacular showcase for I. Miller and for Andy as well. It expanded his audience in a way that no magazine editorial ever could have. In a sea of tiny little images that were the pages of the Times, these bold blockbuster fantasies were extraordinarily effective. What the ads did was to revitalize and revive the I. Miller brand, and from a dowdy, musty, fusty, dusty, dowager establishment, it became a stylish emporium for debutantes.
Art director Geraldine Stutz, exhibition audio guide produced by Antenna audio
in collaboration with The Andy Warhol Museum and the Art Gallery of Ontario
Have students hang their drawings next to their original source material. On a separate piece of paper, ask students to identify what they chose to include and embellish and what they chose to exclude for the original source in their final illustrations. Using a rating scale from 1–5 (five being the highest rating), have students assess the appeal of their product illustrations. Students should write a sentence or two explaining their rating. As a class, discuss which drawings are successful, which are not, and why.
If there is time, make a series of drawings from the same source image with alterations to color, decoration, and impact.
The following assessments can be used for this lesson using the downloadable assessment rubric.