Skip to content

Lesson Rubber Stamping

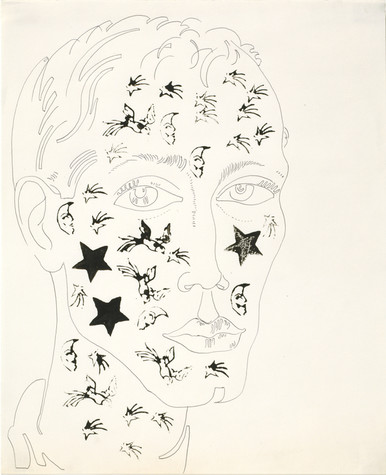
A line drawing of a man’s face that has been stamped with a variety of shapes including stars, shooting stars, crescent moons, and birds.

Andy Warhol, Unidentified Male (with Decorative Stamps), 1950s
The Andy Warhol Museum, Pittsburgh; Founding Collection, Contribution The Andy Warhol Foundation for the Visual Arts, Inc.
© The Andy Warhol Foundation for the Visual Arts, Inc.
1998.1.1682

Use Andy Warhol's rubber stamping technique to explore repetition, pattern, and design.

Repetition, decoration, pattern, and design are explored in this lesson using Warhol’s illustration technique of rubber stamping. Elementary students can embellish shoe drawings with pre-made stamps while older students can create their own stamps and symbols.

Objectives

  • Students discuss the use of pattern and decoration in commercial design and illustration.
  • Students differentiate between pattern and texture.
  • Students investigate positive and negative space by carving their own stamps.
  • Students experiment with repetition and placement.
A line drawing of a man’s face that has been stamped with a variety of shapes including stars, shooting stars, crescent moons, and birds.

Andy Warhol, Unidentified Male (with Decorative Stamps), 1950s
The Andy Warhol Museum, Pittsburgh; Founding Collection, Contribution The Andy Warhol Foundation for the Visual Arts, Inc.
© The Andy Warhol Foundation for the Visual Arts, Inc.
1998.1.1682

About the Art

Warhol used handmade rubber stamps to create repeated patterns and symbols in his commercial work and in a few of his paintings. In the 1950s, numerous companies hired Warhol to illustrate their products, and his drawings often combined rubber stamping with a blotted line technique. The images on his rubber stamps included natural forms like birds, butterflies, fruit, stars, and flowers. The finished work contained texture and pattern and was filled with a playfulness that made the products more appealing. In 1955, Warhol worked on one of the shoe industry’s most sophisticated marketing campaigns when he became an illustrator for I. Miller & Sons shoes. At the time, I. Miller was attempting to create a new image for itself and experimented with marketing strategies that used repetition to imprint its product on the consumers’ minds. Stamping allowed Warhol to quickly create a variety of illustrations along a similar theme. He could alter the color and composition of the artworks, giving his clients a selection from which to choose. The experiment was extremely successful, and Warhol became known in the industry as “the shoe person.”

Points of View

Warhol provided a twentieth-century update on the traditional notion of theme and variation through his use of the infinitely reproducible photographic silkscreen. The subtle permutations he achieved in these paintings through his varied placement of screens and the density of his ink owes much to his familiarity with the repetition he was frequently called on to use in producing variations on a single commercial theme. Although the commercial work differed in function from that of his Pop paintings, it demonstrated his ability to take the same idea and interpret it in a variety of ways, and it reveals something about the process of art making he later called “machine-like.”

Donna M. de Salvo, “Andy Warhol” in Success is a Job in New York:
The Early Art and Business of Andy Warhol
, 1989

Vocabulary

Discussion Questions

  1. What is a pattern? (Define pattern with the class and ask for examples.) How many times do you have to repeat an image for it to be considered a pattern? Test your hypothesis by using stamps or cut paper. Discuss the number of repeats and the placement in different pattern examples.
  2. List objects that have natural patterns.
  3. List objects that designers decorate with patterns.
  4. What is texture? (Define texture with the class and ask for examples.) What kinds of things have textures? Can a “flat” image have texture?
  5. What is the difference between a pattern and a texture?
  6. Why is decoration and pattern used in commercial design?

Materials

Procedure: Make Stamps

Creating rubber stamps requires fine motor skills and the maturity to handle sharp carving tools safely. Teachers may wish to create these stamps ahead of class time, or create a separate unit on the manipulation of cutting tools for older elementary students. Stamps can also be purchased at most local craft stores.

  1. View the Warhol’s rubber stamping technique video on YouTube.
  2. Choose an image from which to create a stamp. These should be simple objects or shapes to create textures and patterns. Examples include stars, moons, stripes, dots, suns, fish, birds, flowers, etc. Using a photocopier, manipulate the image to the desired size. Stamps can be easily repeated when they are between 1″ and 3″ in length and width.
  3. Place a piece of carbon paper, graphite side down, on the rubber printing block. Put the copied image on top of the carbon paper and tape it down.
  4. Trace the outline heavily with pencil, transferring the image onto the rubber printing block. Using a marker, redraw and thicken the carbon lines on the block so you can easily see the lines you need to cut around. The width of the lines depends on students’ cutting skills.
  5. Using scissors, trim your stamp from the large portion of rubber before you carve out the design or image with the linoleum cutting tools. Stamps are most manageable if kept between 1 1/2″ and  4″ in length and width.
  6. Carve around the marker-drawn portion with a linoleum cutting tool. Remind students they are removing any part of the stamp that they do not want to print.

Procedure: Print and Use Stamps

  1. Choose a shoe outline and begin to design your shoe. Commercial artists plan their illustrations by identifying their audience and brainstorming for what is appealing to this group of people.
  2. Ink the stamps on the various colored pads, then press the stamp within the shoe outline or onto the background.
  3. Create repeated patterns; consider the spacing, overlapping, and quantity of ink on the stamp. After two or three repetitions, note how the ink fades or gets lighter. Students may want to play with the stamps and experiment on a practice sheet before designing their shoe.
  4. Use watercolors or markers to embellish the stamping. Try alternating layers of watercolor and stamping for an interesting effect. Students may also wish to stamp colored paper then collage these pieces into their shoe design.

Andy Warhol's Rubber Stamping Technique

Wrap-up

Prior to the critique, students should answer the following in their journals:

  1. Describe how you used repetition on your shoe.
  2. Did you create a pattern? If so, describe your pattern.
  3. Did you create a texture? If so, describe your texture.
  4. How did you use color to enhance your shoe or background?
  5. Why did you pick certain colors?
  6. Who would wear your shoe? Why?
  7. List some adjectives you would use to describe your shoe.

Students should hang all of their shoe drawings on a wall in the classroom. Have students discuss their use of repetition, texture, and pattern. Have students work together to rearrange the installation of shoes to create groupings of works with similar styles, colors, or textures. Discuss this new installation.

Assessment

The following assessments can be used for this lesson using the downloadable assessment rubric.

  • Aesthetics 1
  • Creative process 2
  • Creative process 3
  • Creative process 5
  • Critical thinking 1
  • Critical thinking 3
  • Historical context 2